Thursday, December 8, 2011
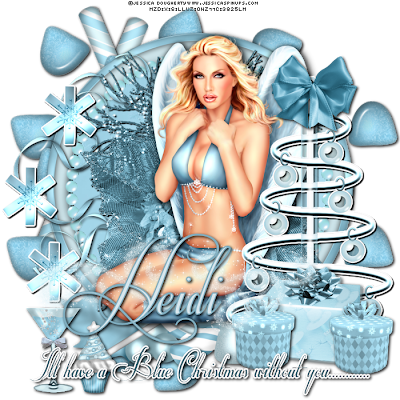
Created By MzDixi
Any resembalance to other tuts is purely coincidental.
I used PSP 9 but any PSP will work.You musthave a working knowledge of PSP to do this tut.
Supplies
Scrapkit by ScottishButterflyCreations
Tube of Choice Jessica Dougherty
You can purchase at CDO
EyeCandy 400-Gradient GlowMura Miester Copies
Open new Image 700x700
Open Cluster Frame Resize to 650 pixelsCopy/Paste as new layerAdd drop shadow
Grab Magic wand and click inside of cluster frameModify/Expand 1Invert.
Grab Magic wand and click inside of cluster frameModify/Expand 1Invert.
Open Paper 2 paste as new layer.
Open candle position in the middleof frame, no resizing.Add drop Shadow.
Copy/Paste tubeAdd Drop ShadowPosition her in the middle of the frame.
Open snowflake Drink,Resize to 150,sharpencopy/paste position to bottom left.Add drop Shadow.
Open Cupcake resize to 100 position to right of the drink,add drop shadow.
Open RibbonResize it 285 copy/pasteposition on top left of cluster frame.Add drop Shadow.
Open Snowflake 2 resize to 150copy/paste,duplicate 2 times and position them on the ribbon.EyeCandy 4000 (Gradient Glow) to the flakes,add drop shadow.
Open Tree 1 no resizingcopy/pasteposition to right add gradient glow add drop shadow.
Open gumdrop EyeCandy Glass,MMCopies "star cluster" send to bottom,duplicate and position top and bottom.
Open Bow 1 resize to 150.Position on top of tree.Add drop shadow.
Open Candy stick No resizing.Rotate with deform tool add drop shadow, duplicate mirror image and send both to bottom.Position one a little lower than the other to the left side.
Open present 1 and 2 resize both to 200 position around tree add drop shadow.
Open Sparkle resize it to 500 position in the middle add light blue drop shadow.
Add CR info and Name on tag.
And any other wording you want to use.
Font I used is Respective.
.
Sunday, October 23, 2011

WOW, I just got my 2nd Award from Schloss(Audrey).Im so honored to reieve this award.Audrey has just made my day,by the way her tags totally rock!Make sure you stop by and let her know how awesome her tags are.Thanks so much Audrey!
I'm suppose to pass this along to 3 blogs that I think
are beautiful in every way.
My choices are:
1.Brooke
She has an awesome Blog and works very hard at it.Her tuts are awesome as well.
2.Mythical
She's a very talented and has some very nice Scrapkits.
3.Susan
A very sweet person, who is very talented,love her work.
Wednesday, October 12, 2011
for My friend
Lori.
Harvest Moon
Created By mzDixi
Any resembalance to other tuts is purely coincidental.
I used PSP 7 but any PSP will work.You must
have a working knowledge of PSP to do this tut.
Supplies:
Tube/tubes of choice, I am using the artwork of Anna Liwanag
to use her tubes you will need to purchase it from PTE
PTU kit Autum Glory by Mythical Designs
My Circle template Here
Penta :Color Dot
Dsb Flux:Bright noise
Font used :Respective
Papers used:3,12 & 13
Elements Used:MD-2,3,4,8,9,10,11,12,14,29
Template by me (Big Circle)Here
Open 700x700
Transparent Image
Open circle Template
Before copy and pasting
to your new Image
grab your magic wand
and hightlight the outter
part of the circle,modify
expand by 1 dsb flux
bright noise Intensity 40 (mix)
Selections Invert Open paper 12
resize your paper to 410x410
copy and paste to the outter part
of the circle position in the center
hit delete,selections none,dsb flux
with same settings as above.
Grab magic wand and highlight
inner circle, modify by 1 selections invert
open paper 13 resize to 450x450
copy and paste,delete.Selections none.
Penta color dot settings value 35,leave
other settings as is.
Add wreath element 10 position in the center.
Click inside wreath with magic wand
modify,expand 1,selections inverts
copy and paste paper 3, delete
penta color dot, settings 42.
Copy and paste circle into
your new image,duplicate
and position them one on top
of the other add drop shadow to both.
Position the circles underneath the wreath.
Add Element 11, position in center.
Position it under paper 3 to cover up the frames
on element 11.
Add your tube,Position it under the wreath.
Then add your ribbon,position it at the botton and
above the wreath,dropshadow.Add element 9
flower, resize it 150,position under ribbon
rotate it free 15 to left,effects sharpen.
duplicate, mirror image.Position to the right
of image,drophadow on both.Open you bow(element 29)
resize it to 130 and position on top of flowers.Dropshadow.
Open elements 2,3 and 4, resize to 121,dropshadow,
position them on the ribbon as shown in tag,or as desired.
Open element 14 resize to 124x89,dropshadow,duplicate
position as shown above or as desired.
Open element 12(moon)resize 231x170,dropshadow
position to left to the bottom.
Add all © info.
Add your name.EyeCandy,Gradient Glow,Drop shadow.
Merge Visible,save as png
 Just want to Thank Brooke and Reika for my First "Award".Im so honored.
BEAUTI♥LICIOUS AWARD!
This award is for the Beautiful Women (and Men)
who grace us with their talents
in the Tagger Community.
The intent of this award is to pass it on
to the Designer, Tagger, or Artist
who has inspired you with their endless talent
and who has touched your heart.
There are many out there.
Let's see how far we can pass this on.
♥HERE'S TO ALL YOU BEAUTIFUL PEOPLE!♥
I choose to pass this to:
CrazyCakesScraps
Monday, October 3, 2011
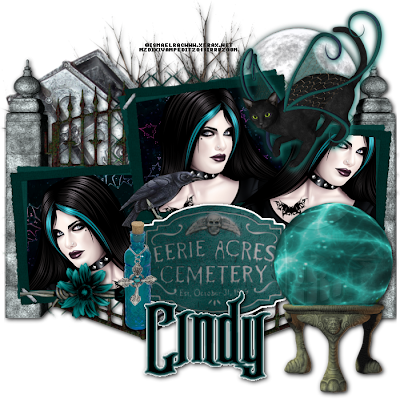
Night at the Cemetary
Written By MzDixi
Any resembalance to other tuts is purely coincidental.
I used PSP 7 but any PSP will work.You must
have a working knowledge of PSP to do this tut.
Supplies:
Tube/tubes of choice, I am using the artwork of Ismael Rac
to use his tubes you will need to purchase it from here
FTU kit Because of the Night,by Digicats(and Dogs)here
EyeCandy 4000 Gradient Glow
Font used :Gracey's Curse
Open a new 700X700 Transparent Image
Open Element Frame 4 resize down to 300
Copy and paste as new layer, duplicate, mirror image.
On the frame image rotate left (free) 10
paste in the middle and above the other frames
on the image.
Grab your magic wand and click inside the frame
modify, expand by 3.
Open choice of paper, I chose paper 12.Resize to
400.Selections Invert image,copy and paste as new layer.
Position paper to your liking,delete.
Add tube/tubes of choice.
Do this for all the frames.
Open Mesh 2 resize to 400
copy and paste as new layer
send to bottom, position behind each frame
Drop Shadow.
Open element dead bush
Resize it to 750, copy and paste
as new layer,drop to the bottom.
Open element moon,resize to 300.
Copy and paste as new layer.
Drop Shadow(color of frame used for DS).
Position to the right.
Open element cemetary sign
resize 250 and position in front of middle frame.
Eyecandy gradient glow,drop shadow.
Open element winged cat,resize.
grab magic wand and highlight wings
colorize with settings Hue:124
Saturation:149.Drop Shadow
Mirror image Copy and paste as new layer.
Position to right on top frame.
Open element crow,resize 150.
Add Drop shadow.Position crow
to left of cemetary sign.
Open bottle 1,resize to 70.
Paste as new layer,position
to left of sign add drop shadow.
Open coffin 2,resize to 250
copy and paste as new layer
rotate 30 to the right, position
below left frame.
Open barbed wire,resize.
Copy and paste as new layer.
Open flower 2,resize to 100.
Copy and paste on top of the
barbed wire.Drop Shadow.
Open Gate 2.Copy and paste
as new layer,Drop Shadow.
Position under the frames.
Open element Magic Orb
Grab freehand tool and select
around the ball and colororize
the same color as used above.
Copy and paste position
to the right of the image.
Add drop shadow.
Add all © info.
Add your name.EyeCandy,Gradient Glow,Drop shadow.
Merge Visible,save as png.
Thursday, September 29, 2011
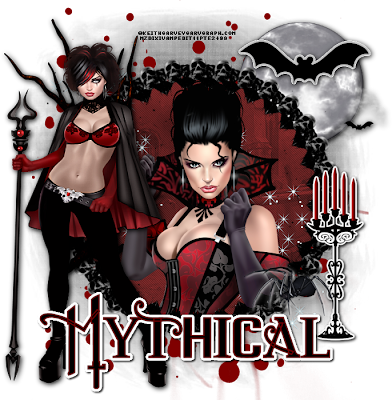
Dark of the Night
written by MzDixi
Any resembalance to other tuts is purely coincidental.
I used PSP Photoshop X3 but any PSP will work.You must
have a working knowledge of PSP to do this tut.
Supplies:
Eyecandy 4000
Tube/tubes of choice, I am using the artwork of keith Garvey
to use his tubes you will need to purchase it from PSP Tube Emporium here
PTU Fright Night kit,by Mythial here
Font used : Sucker Font
Mask 2 By Tonya you can find them here:
Ok lets begin by opening a new image 700X700
Transparent.
Open Frame 3 and resize.
Click inside the frame with your magic wand
Selections Modify by 3, selections invert.
Select paper of choice, I chose paper 5
Copy and paste as a new layer, delete.
Keep the frame selected,Then open your tube
and paste as new layer,resize and position it
inside the frame hit delete.Selections None.
Colorize your paper to match colors of your tube.
Open element 6 and copy
and paste leaving it as your top layer.
Open element 19 and resize it
Copy and paste and position it to the
right underneath the frame.Drop shadow.
Open element 18 resize copy and paste as the top layer
position it to the left side of your image making sure
your tube is above it.
Open element 30 and resize it.
Effects Eyecandy 4000 gradient glow and a drop shadow.
Open element 14 resize and position to the right
on top of the moon.Gradient glow grey.
Drop shadow.
Open element 27 place it to the right at the bottom.
Open element 21 and send it to the bottom.
Next open the other Garv tube and position it to the left.
Open mask flood fill black copy and paste as new layer
and send it to the bottom.
Add all © info.
Add your name.EyeCandy,Gradient Glow,Drop shadow.
Merge Visible,save as png.
Subscribe to:
Posts (Atom)
About Me
- MzDixi
- Georgia, United States
- My real name is Rhonda.I have been psping for over 6 years and Im always learning something new.I live in Georgia with my best friend(hubby) and our furbabies Tazz and Lucy.I plan to start writing my own tuts for the tags I make.I also make templates.I work as a private sitter and work 50 plus hours, but I make time for PSP.It keeps me from going insane.Hopefully you will find something you like.


